UICollectionView는 iOS 앱에서 데이터를 표시하는 데 자주 사용되는 컴포넌트 중 하나입니다. UICollectionView의 각 셀은 일반적으로 특정 데이터 항목을 나타내며, 해당 셀의 배경 색상을 지정할 수 있습니다. 그러나 UICollectionView의 섹션에 배경 색상을 적용하는 것은 조금 더 복잡합니다. 이번 글에서는 UICollectionView의 섹션에 직접 배경 색상을 적용하는 방법에 대해 알아보겠습니다.
willDisplay(_:forItemAt:)에서 셀에 직접 backgroundColor 주입
UICollectionViewDelegate의 willDisplay(_:forItemAt:) 메서드를 사용하여 셀이 표시될 때마다 해당 셀의 배경 색상을 설정할 수 있습니다. 이 방법은 각 셀의 배경 색상을 직접 지정하는 것이 아니라, 각 셀의 배경 색상으로 설정하는 것입니다.
(하지만 itemSpacing 등의 값이 0이 아니라면 이 방식으로는 섹션에 배경 색상을 적용할 수 없습니다)
예제 코드
func collectionView(_ collectionView: UICollectionView, willDisplay cell: UICollectionViewCell, forItemAt indexPath: IndexPath) {
    let section = indexPath.section
    cell.backgroundColor = section % 2 == 0 ? .systemBlue : .systemRed
}
위의 코드에서 colors는 각 섹션에 대한 배경 색상을 포함하는 배열입니다. 이 배열은 모든 섹션에 대해 동일한 순서로 반복됩니다.
UICollectionViewFlowLayout를 커스텀하여 구현
UICollectionViewFlowLayout 클래스를 상속하고 layoutAttributesForElements(in:) 메소드를 오버라이드하여 섹션에 대한 배경 색상을 지정할 수 있습니다. 이 방법은 더 복잡하지만, 더 많은 컨트롤을 제공합니다.
먼저 섹션에 들어갈 Background용 View를 만듭니다.
final class CustomSectionBackgroundView: UICollectionReusableView {
    override init(frame: CGRect) {
        super.init(frame: frame)
        setupView()
    }

    required init?(coder: NSCoder) {
        super.init(coder: coder)
        setupView()
    }

    private func setupView() {
        backgroundColor = .red
        layer.borderColor = UIColor.gray.cgColor
        layer.borderWidth = 1.0
        layer.cornerRadius = 12.0
    }
}
그 다음 CustomSectionBackgroundView를 적용할 CustomFlowLayout을 만듭니다.
final class CustomFlowLayout: UICollectionViewFlowLayout {
    private var decorationAttributes: [UICollectionViewLayoutAttributes] = []

    override func prepare() {
        super.prepare()
        decorationAttributes = []
        guard let collectionView = collectionView else { return }

        (0..<collectionView.numberOfSections).forEach { section in
            let numberOfItem = collectionView.numberOfItems(inSection: section)
            guard
                numberOfItem > 0,
                let firstCellAttributes = layoutAttributesForItem(at: IndexPath(item: 0, section: section)),
                let lastCellAttributes = layoutAttributesForItem(at: IndexPath(item: numberOfItem - 1, section: section))
            else { return }

            let decorationAttribute = UICollectionViewLayoutAttributes(
                forDecorationViewOfKind: "sectionBackground",
                with: IndexPath(item: 0, section: section))
            decorationAttribute.zIndex = -1
            decorationAttribute.frame = CGRect(
                x: firstCellAttributes.frame.minX,
                y: firstCellAttributes.frame.minY,
                width: collectionViewContentSize.width,
                height: lastCellAttributes.frame.maxY - firstCellAttributes.frame.minY)

            decorationAttributes.append(decorationAttribute)
        }
    }

    override func layoutAttributesForElements(in rect: CGRect) -> [UICollectionViewLayoutAttributes]? {
        let attributes = super.layoutAttributesForElements(in: rect) ?? []
        return attributes + decorationAttributes.filter { $0.frame.intersects(rect) }
    }
}prepare()
이 메서드는 레이아웃 객체의 초기화와 필요한 레이아웃 계산을 수행하는 메서드입니다. 이 메서드는 컬렉션 뷰의 레이아웃 업데이트 전에 호출됩니다. 이 메서드 내에서는 뷰에 적용할 레이아웃을 계산하는 데 필요한 데이터를 준비합니다. 이 메서드를 오버라이드하여 컬렉션 뷰의 레이아웃을 변경할 수 있습니다.
예를 들어, UICollectionViewFlowLayout에서는 prepare() 메서드를 호출하여 셀의 크기, 간격 및 행과 열의 수를 계산하고 레이아웃 속성을 적용합니다. 이러한 속성을 수정하여 새로운 레이아웃을 만들 수 있습니다. prepare() 메서드는 레이아웃 속성 계산과 셀 크기 계산을 위한 메서드들을 호출하는데, 이를 통해 컬렉션 뷰에 필요한 레이아웃 데이터를 준비할 수 있습니다.
layoutAttributesForElements(in rect: CGRect)
이 메서드는 지정된 직사각형(rect) 내에서 셀들의 UICollectionViewLayoutAttributes 배열을 반환합니다. 이 배열은 해당 셀들의 레이아웃 속성 정보를 포함합니다. 이 메서드는 컬렉션 뷰의 레이아웃 업데이트 시스템이 호출하여 뷰 컨트롤러가 현재 보이는 셀의 레이아웃 속성 정보를 가져오도록 합니다.
다음은 위에서 작성한 두 클래스를 적용한 예시 코드입니다.
(빠르게 예시를 만들기 위해 하드코딩을 했으니 기능 구현을 위해 참고 정도만 하시는걸 추천드립니다..ㅎ)
final class ViewController: UIViewController {
@IBOutlet private weak var collectionView: UICollectionView!
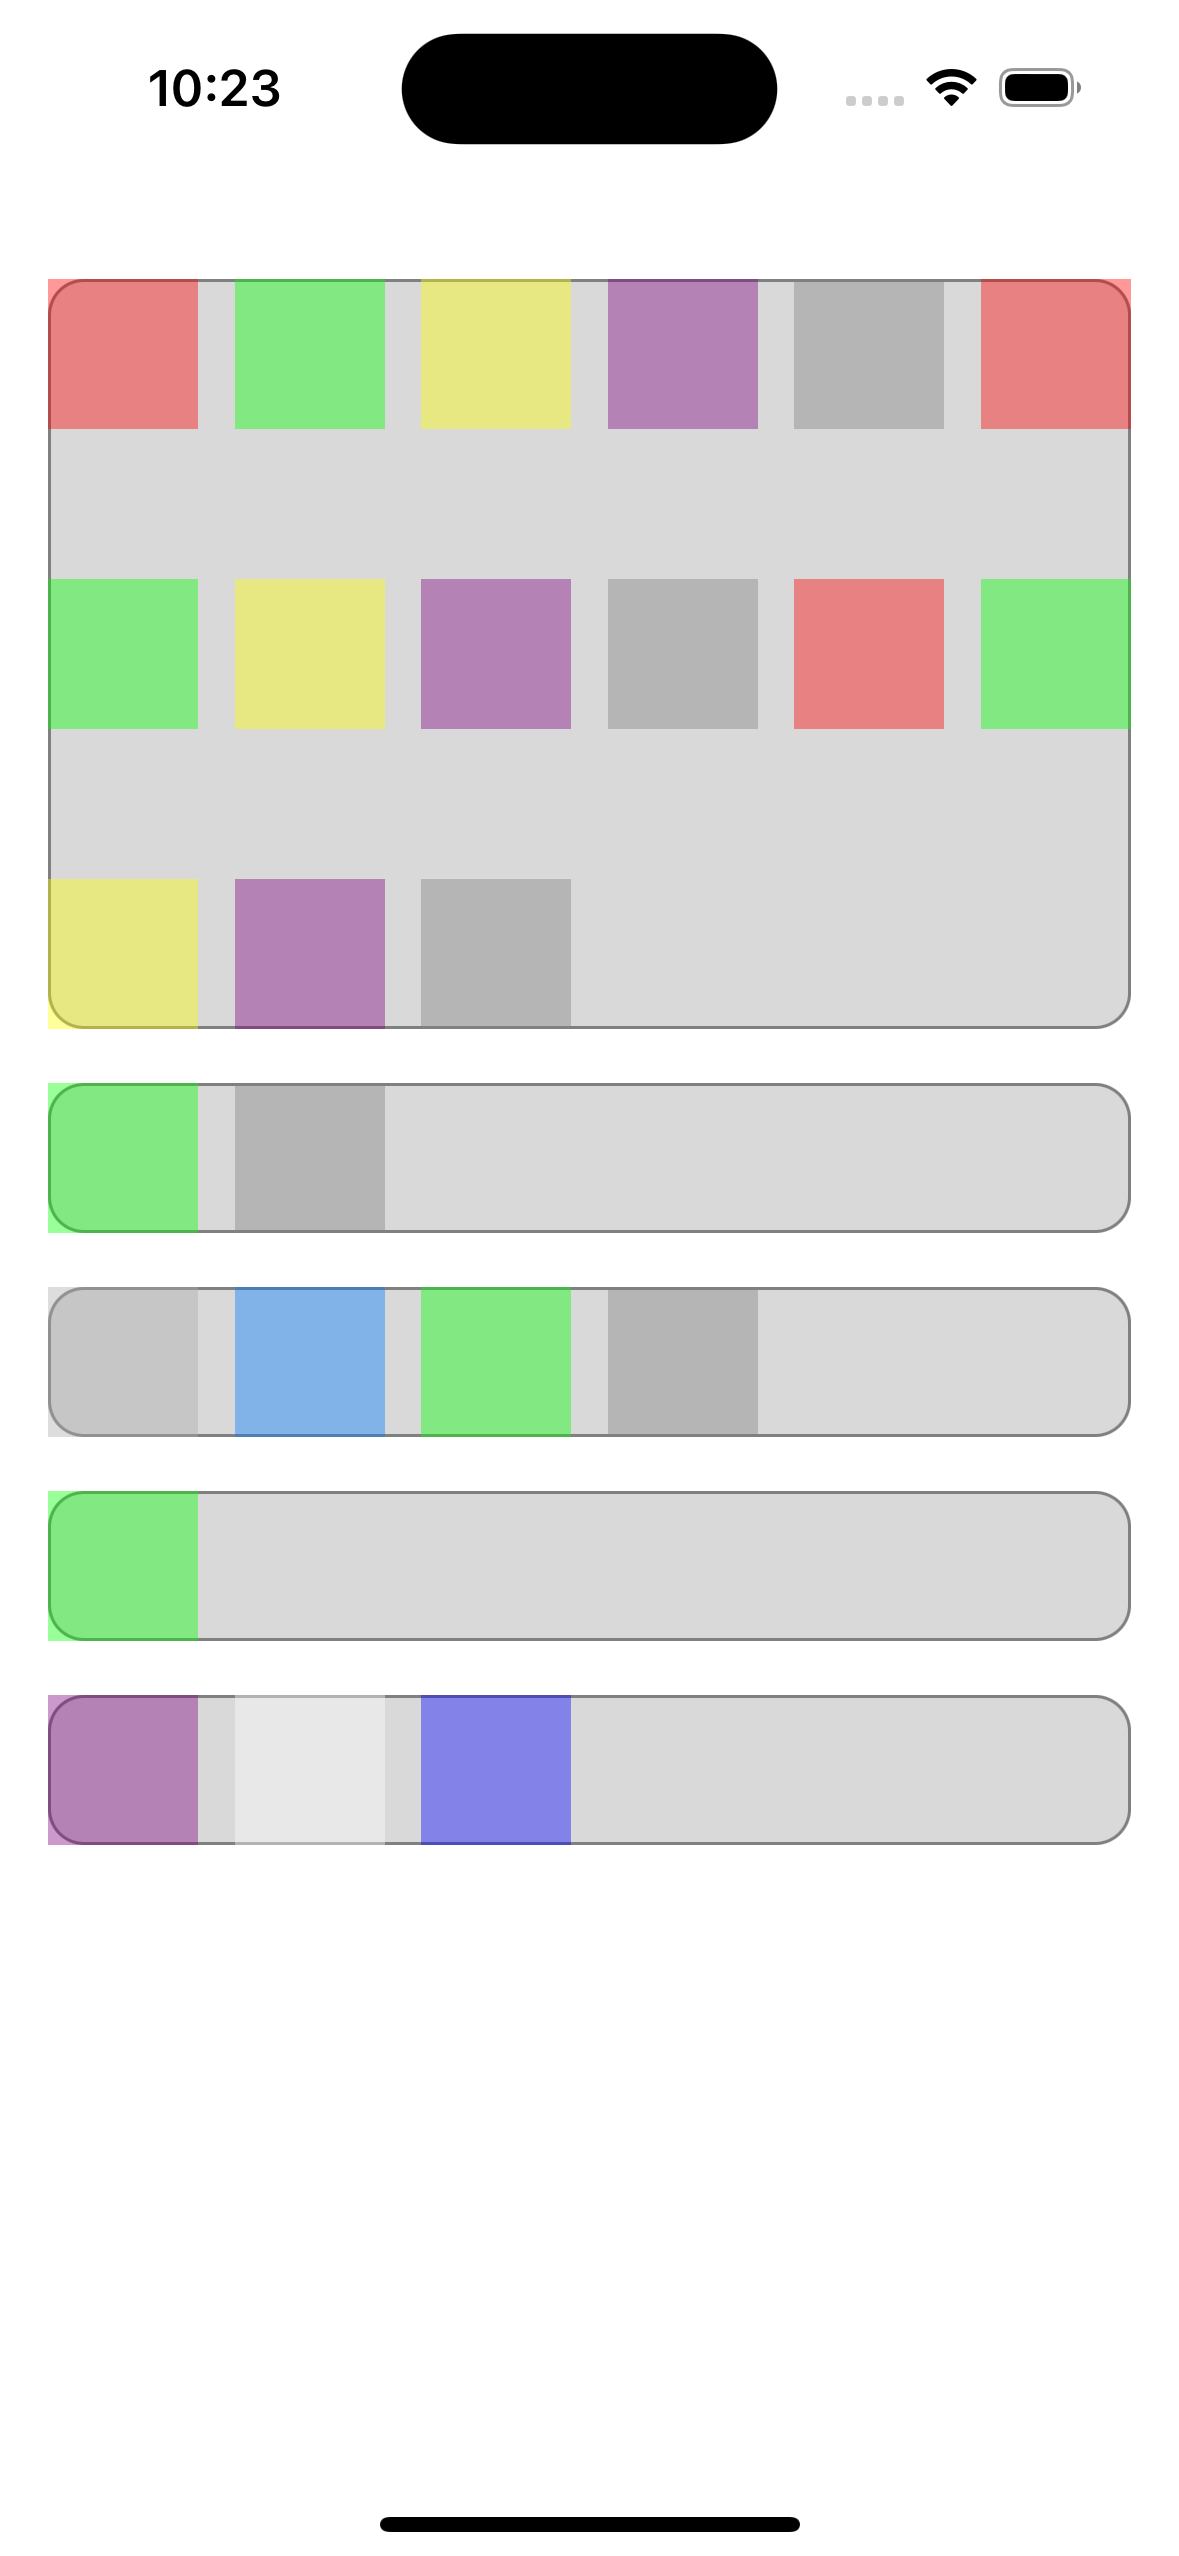
private let colors: [[UIColor]] = [
[.red, .green, .yellow, .purple, .gray, .red, .green, .yellow, .purple, .gray, .red, .green, .yellow, .purple, .gray],
[.green, .gray],
[.lightGray, .link, .green, .gray],
[.green],
[.purple, .white, .blue]
]
override func viewDidLoad() {
super.viewDidLoad()
view.backgroundColor = .white
view.addSubview(collectionView)
NSLayoutConstraint.activate([
collectionView.topAnchor.constraint(equalTo: view.safeAreaLayoutGuide.topAnchor),
collectionView.leadingAnchor.constraint(equalTo: view.leadingAnchor),
collectionView.bottomAnchor.constraint(equalTo: view.safeAreaLayoutGuide.bottomAnchor),
collectionView.trailingAnchor.constraint(equalTo: view.trailingAnchor)
])
collectionView.translatesAutoresizingMaskIntoConstraints = false
collectionView.backgroundColor = .white
collectionView.contentInset = UIEdgeInsets(top: 16, left: 16, bottom: 16, right: 16)
collectionView.dataSource = self
collectionView.register(UICollectionViewCell.self, forCellWithReuseIdentifier: "UICollectionViewCell")
let layout = CustomFlowLayout()
layout.minimumInteritemSpacing = 8
layout.minimumLineSpacing = 50
// CustomSectionBackgroundView을 반드시 등록!
layout.register(CustomSectionBackgroundView.self, forDecorationViewOfKind: "sectionBackground")
layout.scrollDirection = .vertical
layout.sectionInset.top = 18
collectionView.collectionViewLayout = layout
}
}
extension ViewController: UICollectionViewDataSource {
func numberOfSections(in collectionView: UICollectionView) -> Int {
return colors.count
}
func collectionView(_ collectionView: UICollectionView, numberOfItemsInSection section: Int) -> Int {
return colors[section].count
}
func collectionView(_ collectionView: UICollectionView, cellForItemAt indexPath: IndexPath) -> UICollectionViewCell {
let cell = collectionView.dequeueReusableCell(withReuseIdentifier: "UICollectionViewCell", for: indexPath)
cell.contentView.backgroundColor = colors[indexPath.section][indexPath.item].withAlphaComponent(0.4)
return cell
}
}
이번 글에서는 UICollectionView의 섹션에 배경 색상을 적용하는 방법 두 가지를 알아보았습니다. 두 방법 모두 장단점이 있으며, 상황에 맞게 선택하여 사용하시면 됩니다. 또한, 더 좋은 방법이 있다면 피드백을 주시면 감사하겠습니다. 참고하면 좋은 링크도 함께 제공합니다.
참고하면 좋은 링크
- UICollectionView Tutorial: Getting Started
- UICollectionView Custom Layout Tutorial: Pinterest
- UICollectionViewLayoutAttributes Documentation
'프로그래밍 > Swift' 카테고리의 다른 글
| [Swift] 구조체(struct)와 클래스(class)의 차이 정리 (0) | 2023.03.01 |
|---|---|
| WCSession / WCSessionDelegate 정리 (0) | 2023.02.28 |
| [Swift] Opaque Types 찍어먹기 (0) | 2022.02.16 |

댓글